hexo虽然可以方便地部署github静态博客,但是仅仅是把最终生成的html保存在repository中,像原始的Markdown文件,hexo配置文件,主题配置文件,修改文件都仅仅是保存在本地。这样不利于保存,也无法查看每篇博客的修改历史。更重要的是无法做到跨平台,也不易于多人写作。
想法是每次写博客,只需要push md文件及博客所需的资源文件即可。Travis CI持续集成tool可以满足此需求。
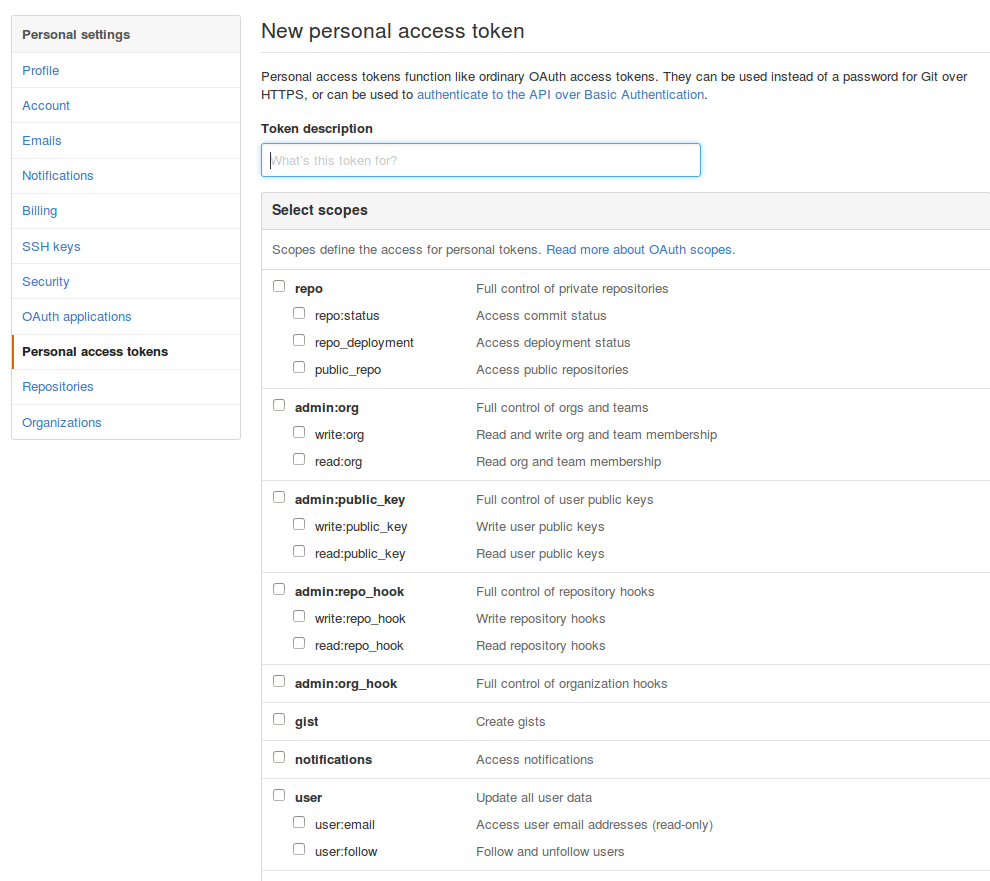
产生Personal access tokens
登录github, settings -> Personal access tokens -> Generate new token
填写token description,比如叫hexo deploy.
勾选上授予的权限,比如我勾选的是repo和gist,然后create.
将产生的token串复制保留下来,后面会使用到,如果丢失,只能重新产生。
Travis CI基本配置
- 打开https://travis-ci.org, 以github账号登录,然后选择需要构建的repository
设置Environment Variables: 取名为“DEPLOY_REPO”,将上一步中复制的token粘贴到此处,关掉“Display value in build log”选项。添加完之后如下图:

check token是否有效
1234apt-get install ruby # gem命令需要安装rubygem install travistravis login --github-token 'token' # token即是上面复制的那个token串travis whoami # 提示用户信息
配置.travis.yml
在hexo博客的repository上新建一个branch “raw”用于保存md文件及资源文件,主题文件等。
1234git branch rawgit checkout rawgit add --all .git push origin raw新建.travis.yml文件,然后push到raw branch
refer to: https://github.com/magicse7en/magicse7en.github.io/blob/raw/.travis.yml
注意branch要设置成only raw:123branches:only:- raw
Test
|
|
打开travis-ci.org, 能够发现正在构建,可以check build log, 看看是否build OK.
如果build OK, 可以打开博客首页check新post的博客有无成功。
遇到的坑
坑1: travis CI构建一直提示github账户授权失败
psersonal token问题,重新产生,并使用travis whoami判断token有效之后再配置travis CI environment variable
坑2:travis CI构建一直提示hexo-renderer-sass错误
在本地deploy并没有发生此问题,在travis vm中出现此问题,解决方式是在.travis.yml中增加
坑3: travis CI自动构建部署之后,博客页面空白,什么也没有
将主题换回默认的landscape则可以正常显示内容。则锁定是next theme配置问题,check发现themes/next 中的内容被ignore了,并没有push到raw branch.
解决方法有二:
使用.gitmodules,该方法会直接将next theme repository import进来,这样的好处是可以使用最新的next theme,坏处是没法客制化自己的主题配置文件
123[submodule "next"]path = themes/nexturl = https://github.com/iissnan/hexo-theme-next删除themes/next的.git和.gitignore,然后就可以讲themes/next的内容push到repository中了。
Others
在.travis.yml中将node_modules添加到cache中,可以加快构建速度
123cache:directories:- node_modules如果想在github的README.md显示构建成功与否的标示,可以修改README.md:
1[build-info](https://travis-ci.org/userName/repoName.svg)

Reference
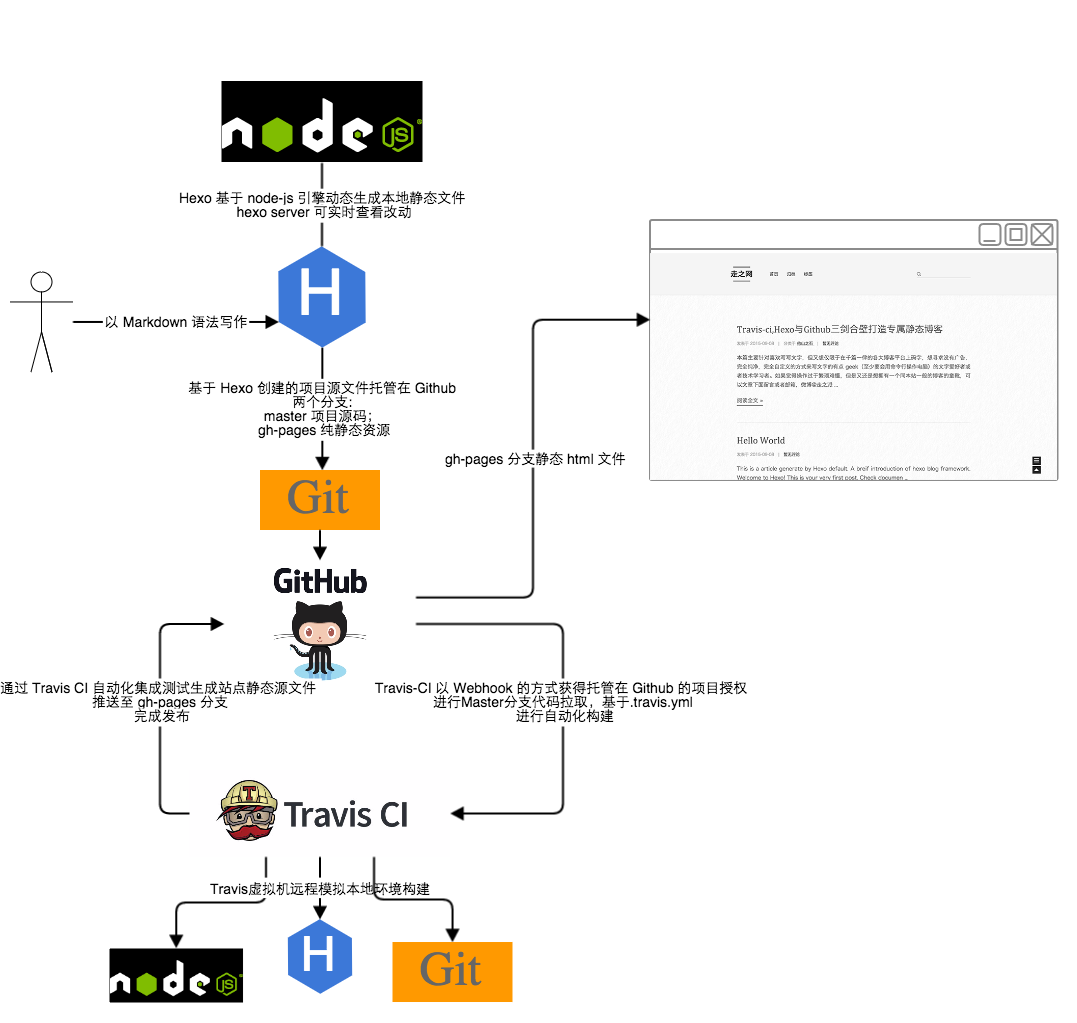
借用一张图说明Travis CI自动构建hexo博客的流程: